La-crosse-technology WS-9257U-IT User Manual
Browse online or download User Manual for Thermometers La-crosse-technology WS-9257U-IT. La Crosse Technology WS-9257U-IT User Manual
- Page / 37
- Table of contents
- BOOKMARKS
- WS-9257U-IT 1
- Wall mounting case 3
- BATTERY CHANGE 5
- FUNCTION KEYS 5
- LCD SCREEN 7
- To select a Canadian city: 16
- TO EXIT SETTING MODE 18
- THE MOON PHASE 18
- WEATHER TENDENCY INDICATOR 20
- LOW BATTERY INDICATORS 24
- THERMO-HYGRO TRANSMITTER 24
- 915 MHz RECEPTION 24
- SPECIFICATIONS 27
- CARE AND MAINTENANCE: 27
- WARRANTY INFORMATION 28
- EJMA9257L210 37
- Printed in China 37
Summary of Contents
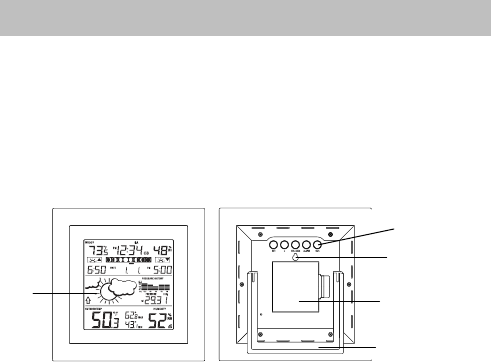
1 LCD display Function keys WIRELESS 915 MHz WEATHER STATION WS-9257U-IT Instruction Manual INTRODUCTION Congratulations on purchasing this weat
10 3. Press the SET key to confirm and enter the “Daylight Saving Time setting” or exit the setting mode by pressing the ALARM key or SUN key. DAYL
11 To set the clock: 1. The hour digit will start flashing. 2. Use the + key to increase or MIN/MAX key to decrease the value. Keep holding the k
12 3. The month digit will be flashing. Use the + key to increase or MIN/MAX key to decrease the value. Press the SET key to enter date setting. Ke
13 LOCATION SETTNG FOR SUNRISE/SUNSET TIME The weather station will automatically update the sunrise, sunset and sun duration time at 00:00, based o
14 To select a US state and city: 1. Once “USA” has been selected, press the SUN key to enter the state setting. 2. The state code (2 letters abbr
15 6. Press the SUN key twice to go back to normal date display. 7. User can exit the setting mode by pressing the SET key or ALARM
16 To select a Canadian city: 1. Once “CAN” has been selected, press the SUN key to enter the city setting. 2. The city code (3 letters abbr.) wil
17 4. Press the SUN key twice to go back to normal date display. 5. User can exit the setting mode by pressing the SET key or ALARM
18 2. The hour digit will be flashing. Press the + key or MIN/MAX key to adjust the hour. 3. Press ALARM key once and minute digit will be flashing
19 New Moon Waning Crescent First Quarter Waxing Gibbous Waxing Crescent Last Quarter Full Moon Waning Gibbous WEATHER FORECASTING ICONS We
2 12 hour time display (seconds displayed by pressing the SUN key) Weekday, date and month display (year only in setting mode) Daylight savi
20 Note: After setting up, readings for weather forecasts should be disregarded for the next 12-24 hours. This will allow sufficient time for the Wea
21 Note: Once the weather tendency indicator has registered a change in air pressure, it will remain permanently visualized on the LCD. AIR PRESSU
22 Note: For accurate barometric pressure trends, the weather station should operate at the same altitude for recordings (i.e. it should not be mo
23 DISPLAY OF INDOOR/OUTDOOR MAXIMUM AND MINIMUM RECORDS Press the MIN/MAX key several times to view the MIN/MAX indoor temperature, and MIN/MAX outd
24 LOW BATTERY INDICATORS Low battery indicator will show on the LCD when the batteries of weather station or transmitter require changing. THERMO-
25 reset. Should this happen accidentally then reset all units (see Setting up above) otherwise transmission problems may occur. The transmission ran
26 Note: Always ensures that the unit locks onto the screw head before releasing. POSITIONING THE THERMO-HYGRO TRANSMITTER: The thermo-hygro transm
27 CARE AND MAINTENANCE: Extreme temperatures, vibration and shock should be avoided as these may cause damage to the unit and give inaccurate fo
28 Data checking intervals: Indoor checking interval : every 16 seconds
29 La Crosse Technology, Ltd will repair or replace this product, at our option and at no charge as stipulated herein, with new or reconditioned part
3 The outdoor thermo-hygro transmitter Remote transmission of outdoor temperature and humidity to weather station by 915 MHz Alternately disp
30 misrepresentation by the seller or performance variations resulting from installation-related circumstances. LA CROSSE TECHNOLOGY, LTD WILL NOT
31 Product Info and Support: www.lacrossetechnology.com/9257 Product Registration: www.lacrossetechnology.com/support/register The complete inst
32 List of Country / State / City Codes USA = UNITED STATES OF AMERICA ALABAMA (AL) MONTGOMERY = MGM MOBILE = MOB ARKANSAS (AR) LITTLE ROCK = LIT AR
33 INDIANA (IN) EVANSVILLE = EVV INDIANAPOLIS = IND KANSAS (KS) DODGE CITY = DDC WICHITA = K32 TOPEKA = TOP KENTUCKY (KY) LEXINGTON = LEX LOUISIANA (
34 ALBUQUERQUE = ABQ NEVADA (NV) LAS VEGAS = LAS RENO = RNO NEW YORK (NY) BUFFALO = BUF NEW YORK CITY = JFK SYRACUSE = SYR OHIO (OH) CLEVELAND = CLE
35 NORFOLK = ORF VERMONT (VT) BURLINGTON = BTV WASHINGTON (WA) SEATTLE = SEA SPOKANE = SFF WISCONSIN (WI) GREEN BAY = GRB LA CROSSE = LSE WEST VIRGIN
36 FCC ID: OMO-M-15 (transmitter) FCC DISCLAIMER RF Exposure mobile: The internal / external antennas used for this mobile transmitter must provide
37 Reorient or relocate the receiving antenna. Increase the separation between the equipment and receiver. Connect the equipment into an out
4 within 80 seconds, remove the batteries from both units for 2 minutes and start again from step 1. 4. Allow the weather station and the transmitte
5 HOW TO INSTALL AND REPLACE BATTERIES IN THE WEATHER STATION The weather station uses 2 x C, IEC LR14, 1.5V batteries. To install and replace the ba
6 SET key Press and hold for 2 seconds to enter manual setting modes: LCD contrast, DST ON/OFF, manual time setting, calendar and relat
7 Press and hold the key for 2 seconds to reset ALL indoor/outdoor minimum/maximum temperature recordings to current readings To stop the alarm
8 *When the signal is successfully received by the weather station, the Outdoor reception icon will be switched on. (If not s
9 whether the last reception was successful (icon on) or not (icon off). On the other hand, the flashing of the icon shows that a reception is being
More documents for Thermometers La Crosse Technology WS-9257U-IT

© 2020, manymanuals.com. All rights reserved. | 1.320 s |
 Manymanuals.com
 Manymanuals.de
 Manymanuals.fr
 Manymanuals.it
 Manymanuals.pl
 Manymanuals.cz
 Manymanuals.es
 Manymanuals-pt.com
Comments to this Manuals